Content: |
This manual should guide you through the main steps of creating and modifying glossary terms on the SSWM server. For each glossary entry, two main steps are required:
1) Create the term and its definition (Direct link 1 to Create Glossary Term), and,
2) Create a glossary page for the term (Direct link 2 to Create Glossary Page).
1) Step 1: Create the Glossary Term
- If you don’t have an account yet, go to create new account and enter a username and your e-mail address. Then check your mail regularly until you receive the confirmation that your account has been created. Follow the link in the e-mail to confirm your account and set your password.
- Login in to the sswm.info page (http://sswm.info/user).
- Choose "Contents (Glossary)" and then "Glossary Terms" in the left menu column on the Intranet. Go through the glossary terms and check whether the term you want to enter already exists in the database. If the term already exists and you would like to modify it, click on "Edit term".
- To create a new glossary term, choose "Create Glossary Entry" in the left menu column on the Intranet. If this option does not appear, contact the administrator.
- Chose "Step 1: Create Glossary Term". Then click "Add term".
- The following window appears:
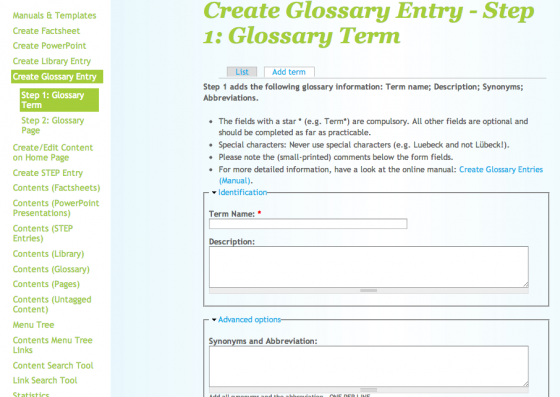
- You enter the term's name, as well as its definition (description) in the fields (see picture above).
- If abbreviations and/or synonyms of the term exist, click on "Advanced options". The Synonyms and Abbreviation field appears:
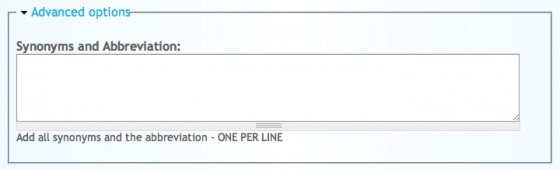
You should write one synonym per line. Related glossary terms can also be selected if relevant (e.g. urine diversion). All synonyms are recognized in the SSWM website, and the same definition displayed; also, if a term has several spellings (e.g. fertiliser / fertilizer), mark all secondary spellings in the synonyms field, but the first one in the term field (e.g. fertiliser, because of British grammar rules…). Abbreviations are also to be entered in this field, otherwise they will not be recognised!
Glossary entries which are only a term and abbreviation without description: e.g. World Health Organization – WHO have to add the term (e.g. World Health Organization) also in the "Description“ field in order to make sure it is recognized automatically in the text.
When you're done, do not forget to click on the save button at the bottom of the page.
2) Step 2: Create the Glossary Page
You now need to create a glossary page.
- Choose "Create Glossary Entry" in the left menu column on the Intranet. If this option does not appear, contact the administrator.
- Choose "Step 2: Create Glossary Page".
- You should have the following view now:
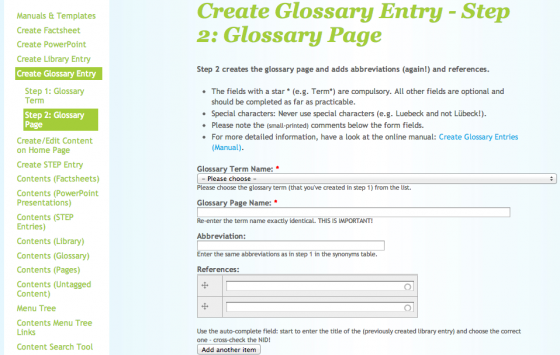
- Go to Glossary and select the term’s name you have added in step 1. In the Term field, you need to write exaclty the same term (to make sure that it is accurately the same, copy and paste it!). If an abbreviation exists for the term, write it in the abbreviation field. You must have written it in the “Add glossary term” page, too (Synonyms and Abbreviation field).
When they exist, References have to be found using the provided auto-complete fields (looking for the title). Otherwise, you first have to create them. To create References, make a table with two columns, one containing the correct citation (see also the manual “Checklist for SSWM Factsheets”), and one the description and send them to the administrator (dorothee.spuhler@seecon.ch). If you are an advanced sswm user (;-) you can create the references yourself by using the Manual “Create SSWM References”.
The auto-complete field only displays 10 references; this can be a problem when more than 10 websites use the same short adress (e.g. http://en.wikipedia.org), as only the short form of the address is recognised by the field. For such websites, you have to find their reference number in the Reference list (the “nid”). The nid (reference number) can be entered directly into the auto-complete field as [nid:xxx] (xxx is the reference number). In any case, to make sure that you have got the right reference, you can also use the nid, as this is the unique identification number for every sswm content. |
You don’t need to add any revision information, although you can (this field is only for internal use).
Again, don’t forget to save at the end!!!
You may want to edit the glossary page of a term to modify its abbreviation or add/remove references: select Contents (Glossary) in the left panel. Then click on the submenu "Glossary Pages" and find the page. You can now click on Edit, and modify it as explained above.