Content: |
This document should guide you through the main steps of creating factsheets on the SSWM server.
Direct link to Create Factsheet.
1) Factsheet Types (A, B, C, D) - A Comparison
| Type A - SSWM Tool | Type B - Trainer Contribution | Type C - General Contribution | Type E-STEP |
| Title of the measure/tool/approach/instrument | Title of the topic | Title of the topic | Title |
| Author / compiled by | Author / compiled by | Author / compiled by | Author / compiled by |
| Authoring information | Authoring information | Authoring information | Authoring information |
| Taxonomy | Taxonomy | Taxonomy | Taxonomy |
| Adapted from | Adapted from | Adapted from | - |
| Executive summary | Executive summary | Executive summary | Executive summary |
| Description of the measure / tool | Description of the topic | Description of the topic | Content |
| Applicability | Applicability | - | - |
| Advantages | Advantages | - | - |
| Disadvantages | Disadvantages | - | - |
| PowerPoint Presentation | PowerPoint Presentation | PowerPoint Presentation | PowerPoint Presentation |
| - | - | - | Video |
| References | References | References | References |
| Further Reading Material | Further Reading Material | Further Reading Material | Further Reading Material |
| Related Content 1-8 | Related Content 1-8 | Related Content 1-8 | Related Content 1-8 |
| Icon | Icon | Icon | Icon |
2) General Procedures
2.1) The Factsheet Folder
The factsheet folder contains all document necessary to upload a factsheet:
'Picture'
Make sure the folder is complete before you start uploading the factsheet!
2.2) Create a New Factsheet
- Click on "Create Factsheet" in the left column on the Intranet.
- You will find a menu with three items, i.e. the three factsheet types SSWM offers. Choose the type according to the descriptions provided. If you're uncertain, better ask your supervisor. Note: This step cannot be reversed. Once you've created a factsheet, its type cannot be changed!
- Fill out the form field according to the comments.
- Don't forget to save the factsheet every once in a while to avoid loss of data! Important note: Never click the "Go Back"-button in your browser! All entered data will get lost.
2.3) Work on an Existing Factsheet (Add Content, Make Changes, etc.)
- Click on "Contents (Factsheets)" in the left column on the Intranet.
- Use the search tool or browse the list to find the factsheet you want to work on.
- Click on "Edit".
- Implement the changes. (You find helping comments right next to all fields).
- Don't forget to save the factsheet at the end!
3) Description of the Measure/Tool/Approach/Instrument
The description field contains the main content of a factsheet. It is handled almost like a simple word processor.
The following instructions will:
- Point out differences to a regular word processor (e.g. MS Word),
- Explain how to add and layout text, tables, images, and,
- Provide tips for a faster and more efficient work flow.
Structure: 3.1) General Instructions 3.2) Tables 3.3) Pictures
3.4) Grammar and Spelling |
3.1) General Instructions
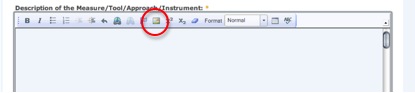
TIPP: You can open the content entry field in a maximised window to make it easier to work on that part. For this, click on  for maximising the field. To go back to the normal view, simply click again on the same button.
- First, activate the “Show Blocks” button:
 .
. - In the “Description of the Measure” field you need to reproduce exactly the content of the description field from the word document. That means that you also need to enter sub-titles, figures, pictures and figures captions. You also will need to check the spelling and make sure that special characters (upper and lower case characters, eg. CH4 or m2) are correctly displayed!
- You start the operation with copying all the text from the word document. To make sure that the text does not contain any strange formatting, you start ‘cleaning’ it: Highlighting all the text and then choose the rubber:

The basic formatting style for the text is “normal” text. To start with, format all text like this:

Now you need to format the document and to add the figures and tables.
The main things to pay attention to when doing this are the subtitles, the special characters, comments and the figures/pictures
Subtitles
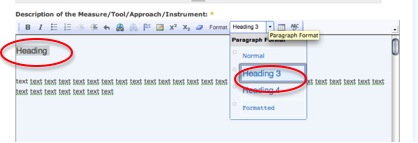
You have two levels (options for subtitles, level three and four) in addition to the second level, which corresponds to Description of the Measure/Tool/Approach/Instrument and the first level, which corresponds to the Title of the factsheet itself (e.g. Arborloo – The Simplest Single Pit Composting Toilet). These two additional levels are called Heading 3 and Heading 4. Go through the text and identify these headings. You need to define their formatting style respectively by highlighting the sections with the mouse and by choosing the respective heading style type in the Format field.
You find the options for the selection of the heading styles in the same field as the normal text style format:
How to enter special characters (upper, lower case characters and bullet points)
You can format special characters, bullets points or enumerations as in a word document.

Bold and italic text can be formatted by the same way:

3.2) Tables
Click with your right mouse button on the table, the following menu appears:
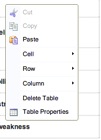
Choose “Table Properties”: add the name of the caption
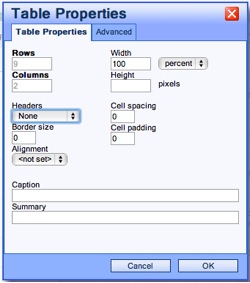
Click on “Advanced”:
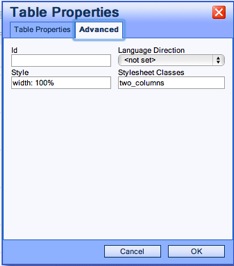
In the field “Stylesheet Classes” enter the following:
| For two columns: | two_columns |
| For three columns: | three_columns |
| For four columns: | four_columns |
Caption: Highlight the caption of the table. Click on the div-buttom and write "caption" in the "stylesheet classes".
3.3) Pictures
Pictures A) How to UPLOAD Pictures on the Server
Before you can start to add pictures to the description field, you need to upload them to the server first. The original of the pictures are available in the “1. Pictures and Graphs” folder of the respective factsheet folder.
To upload the figures to the server, follow these steps:
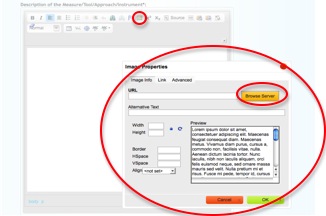
- A1: Chose the Figure symbol in the toolbar from the “Description of the Measure” field.
The Image Properties window will open:
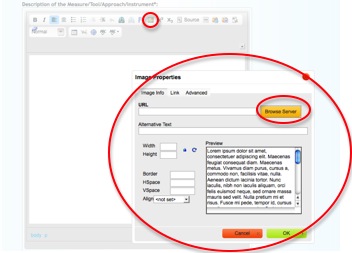
- A2: Go to Browse Server, the following view appears:
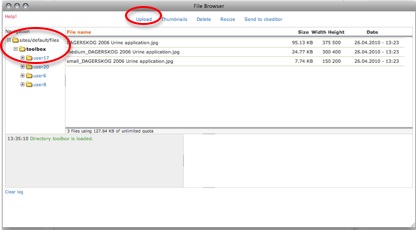
- A3: Make sure that you are in the toolbox folder (see left red circle above). Then choose Upload, and choose File.
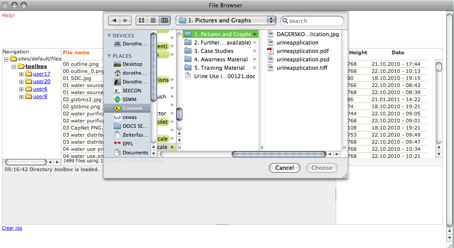
- A4: Go to the folder, where you have saved the “1. Pictures and Graphs” folder for the factsheet your are entering and choose the picture you want to upload.
- A5: Then click on upload. The picture will be saved in the database. You need to repeat this upload process for each picture in the “1. Pictures and Graphs” folder.
When you have uploaded all pictures versions, close the following windows:

You are now ready to start to insert the figures and pictures --> B)
Pictures B) How to INSERT Pictures into the Description Field
Make sure you have previously uploaded any picture or figure you want to introduce in the document as described above.
To insert pictures into the text as figures, follow these steps:
- B1: Got to the position in the text where you want to place the figure. Place the cursor before the paragraph, in which you want the picture to float. Than click on the picture symbol again
The following window will open again:
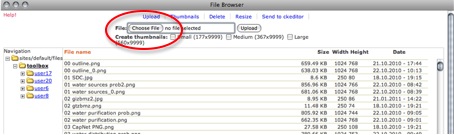
- B2: Go to Browse Server again the following view appears:

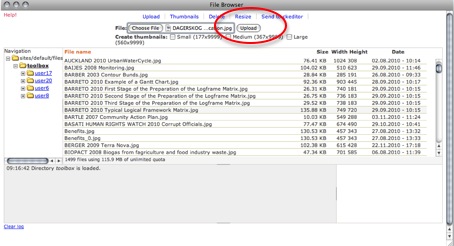
In the centre of the window, you will find a list of the file names.
- B3: Choose the right one and than click on “Send to ckeditor”:
Now you are redirected to the image properties field:
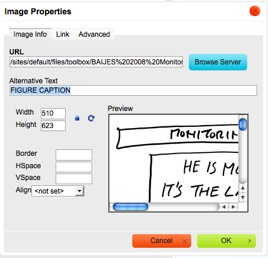
- B4: In the Alternative Text field you have to copy-paste the figure caption from the word doc (the description below the figure) of the factsheet. This is important, as we need to save the description for every picture somewhere to be sure that we can trace it. However, the system does not recognise brackets ( or ) and [ or] OR ANY OTHER SPECIAL CHARACTER so you need to delete these symbols in the text (e.g. if you have a link in the capture, don’t copy it with the rest…..)
- B5: Then click on OK. The picture will now appear in your Description Field.
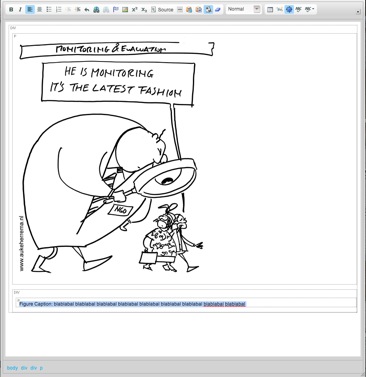
- Of course you have also to write and the caption direct into the description field below the figure on a new line.
Pictures C) How to LAYOUT Pictures in the Description Field
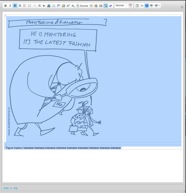
- C1: Highlight with your cursor, both picture and caption (as done below):
- C2: Now, click on the Div Container button
 . The following window opens (don’t worry, sometimes, this takes a few seconds).
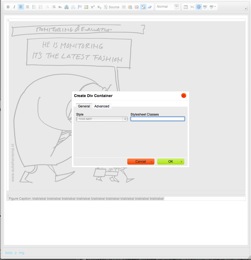
C3: In the field “Stylesheet Classes” (see above) you can now enter a code, which defines, where and in what size the picture should appear in the text:
| For pictures that should be aligned left: | sl (for a small picture, ⅓of the text width) |
| ml (for a middle-sized picture, ⅔of the text width) | |
| For pictures that should be aligned right: | sr (for a small picture, ⅓of the text width) |
| mr (for a middle-sized picture, ⅔of the text width) | |
| For pictures that should appear in maximum size (entire text width): | l |
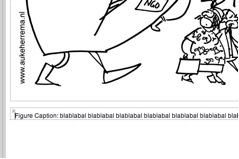
- C4: Click on OK to return to the content entry view. Now the picture appears in a Div Container
Principles for the Alignment of Pictures: 1. Generally, pictures should be aligned left. 2. In case there are many pictures in one factsheets, some of them may be also aligned on the right to avoid monotony. 3. The more pictures there are in a factsheet, the more should be small in size. To avoid too long loading times with slow connections. 4. If possible, graphs with text should be readable in the website (without enlargement) |
- C5: Now, you need to highlight only the figure caption. Then choose again the Div Container button: .
- C6: For the caption, write “caption” in the “Stylesheet Classes” field and click on OK. The result should look like this (it can take a moment until this view appears and the Div Container dialogue box disappears, don’t worry- be patient!):
Tips:
Before you start the procedure as described above, make sure, that the picture is in a separate P container than the text. If this is not the case, simply press once enter at the end of the text paragraph
| Before: | After: |
 |  |
The procedure described above should allow you to correctly layout the pictures and the text so as the factsheets look nice
The role is, that a picture “floats” in the paragraph (P-Box) before which it has been inserted. If you want, that to start a new section (and force the picture to appear before this new section) you can add a horizontal line after the paragraph: |

Pictures D) How to OPTIMISE Pictures in the Description Field
The only thing left to do is to optimise the pictures to make sure, they appear at the same size as in the word document, that is:
- Small: s
- Medium: m
- Large: l
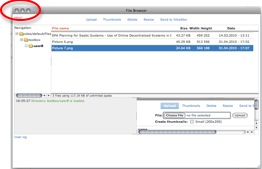
- D1: Make sure you have activated the “maximise”and the “show blocks”buttons.
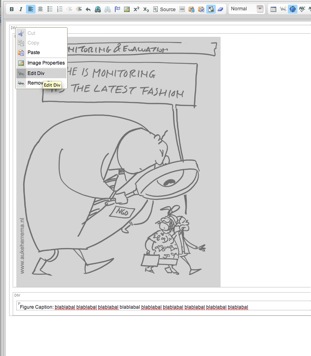
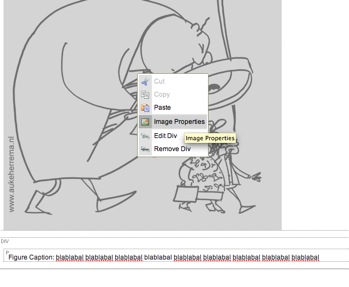
- D2: Now go to the first picture in the description field. Click right on the DIV in the left upper corner of the Div container and select Edit Div
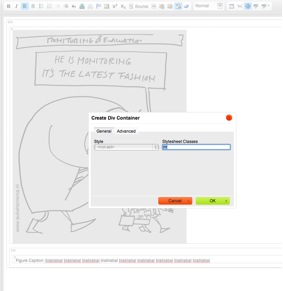
- D3 : In the opening window, remember the letters in the field “Stylesheet Classes”. “ml” in the example below:
- D4: Click on “Cancel”. Right click on the image and select “Image properties”.
- D5: In the opening window, remember the filename of the image. It’s the part of the url from the last slash to the end of the string
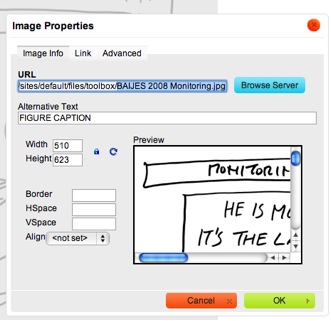
If the filename starts with “small_” or “medium_”, ignore this prefix.
- D6: Click the “Browse Server” button. Find and select the image in the opening file browser by it’s name.
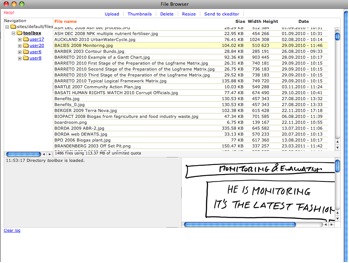
- D7: Click the “Thumbnails” button at the top border of the file browser window.
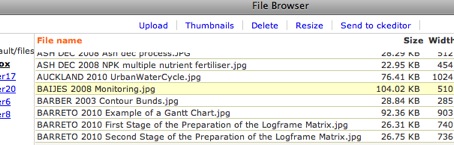
- D8: Generate a Thumbnail according the letters you remembered before:
“sl” or “sr” → small thumbnail “ml” or “mr” → medium thumbnail “l” → large thumbnail |
- Click on “Send to ckeditor”.
- Click on “OK”.
- D9: Repeat the steps for every image in this factsheet. Save the article.
3.4) Grammar and Spelling
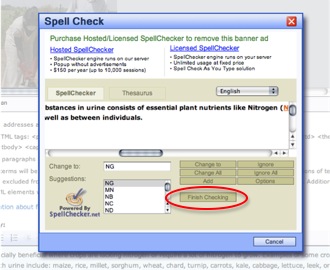
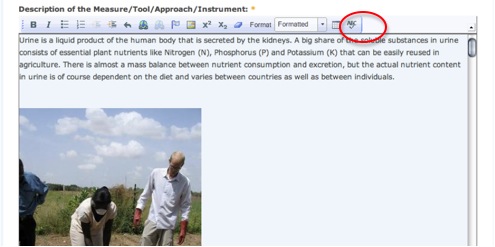
As a final step, you can now use the automatic spelling checker from the browser. Highlight all the text and click on the grammar checker symbol:
The grammar checker works most like a normal word grammar checker but looks slightly different:

You can basically change or ignore indicated errors. Once you went through the document, you need to close the window by choosing “Finish Checking”. If you choose “Cancel” instead of “Finish Checking”, all your modifications will be lost!